Follow Me on Pinterest

Tuesday, August 31, 2010

I love a great deal!

So I went to Michael's tonight and as usual they had their clearance bins outside.  Honestly I'm not usually impressed with their sales but today they had "Grab bags".   I have fun memories of my mom taking my sister and I to the jewelry store and buying us grab bags so kids, so seeing these perked my interest.  I checked them out and found some good deals.
Here's bag one for $2 ......
six pairs of flip flops (one pair fits Ella the rest will be good to denote), two packages of sea shells, and 3 fabric number patches. I checked the price of shells and saw that one bag a shells alone cost $12.99 at regular cost.  My hubby has a fish tanks that he is always looking for new shells and rocks for, plus they make good decorative pieces!

Bag number two.....
count them, that's 17 candles for $2.  That makes each candle .12cents.  These can make cute little gifts, just add some decorative touches.

I was pretty excited and proud of my find!

Wednesday, August 25, 2010

Clothes Pin Magnets Tutorial

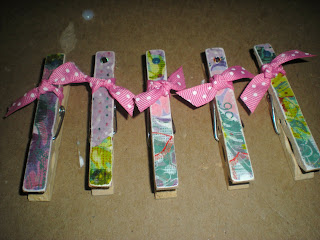
Clothes Pin Magnets, one more thing checked off my list!

This is a project that I am considering doing with my MOPS group.  I've made them before but don't take any photo's.  You can find these tutorials many places, but I like that think I add a little bit of my own style to them.

Materials:
  • Clothes Pins
  • Scrapbooking Paper
  • Ribbon
  • Mog Podge glue (I use the orange and yellow bottle)
  • sponges brush applicator
  • E6000 Glue
  • Flat back Crystals
  • Sand Paper 
  • X-acto Knife 
  • Sticky back magnets
 Remove one side of the clothes pins.
Sometimes this can be a little tricky, but if you pull the clip open a little
and wiggle it, it should come out.


Put a coat of the Mod Podge (I use yellow) on the back side of the scrapbook paper and outside of the clothes pin.  Then line the glued sides together.


Use the X-acto knife to cut around each clothes pin.


Get out the sand paper and sand the paper around all the edges.  Make sure to sand off any edges  of paper hanging over (I sand also to give a distressed look).


Finishing Coat.  I use the orange bottle of Mod Podge to apply a finishing light coat on the paper (I apply two light coats in a criss-cross with about a minute in between coats, for a textured look)


For a little embellishment, I used a small dot of E6000 on the top end of the clothes pin (the side that you pinch to open).  Place a flat back crystal in the glue.

Cut a 5" piece of ribbon and tie them around the pin just under the crystal and put the 
clips back together (once again this can be tricky).

Last but not least, take you magnets, remove the paper and attach the magnet to the top backside of the clothes Pin.  I've use the magnet tape because I'm looking to use this for my MOPS group and it keeps the costs down, but if your looking for these to have a strong hold then I'd use the round disc magnets.


Then place into your newly made "light box" for a final picture and......Voila!

Enhanced by Zemanta

Wednesday, August 11, 2010

Light Box Tutorial

So I finally did one thing on my "to do" list.  I made a light box to hopefully make the photos of my crafts better.Supply List:
  • Card board box
  • White fabric 
  • White duct tape
  • Strong adhesive (that will work on card board)
  • Utility Knife  
  • White poster board
  1. The first step is to take your cardboard box (I bought a large moving box from Home Depot) and if they are not already, fold the side flips together and use a strong adhesive, especially near the inside corners for extra strength.  I used hot glue.


2.  Now use a straight edge to draw a square on each side (or leave one side solid for the bottom, depending on whether you want to use the box in different positions) of the box about 3 inches inset from the outside edges.  Then using a utility knife cut along the lines.


3.  Cut the white fabric about an inch longer then your windows on each side.  Then use the white duct tape to attach the fabric to the box along the sides.

3. Now you have a light box.  Place the poster board along the floor and back side of the light box.

4.  Now to put it to use.  Place some lights on the outside of the windows and place your object in the middle.


5. To add a personal touch, I added scrapbook paper as a background.