Follow Me on Pinterest

Monday, September 27, 2010


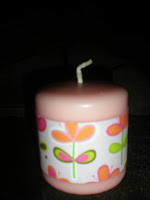
Remember my great Grab Bag buy at Michael's, well I decided to make a quick candle gift.  I didn't have to buy anything other then the candle for this.  I just used things around my crafting room.  With the candle only being .12cents, I think this easily qualifies as under $1.50.


Start with a plain candle

Cut a stripe of scrapbook paper to wrap around candle
add a little embellishment: I used a little string and a button I found in my craft room


For the special touch wrap it up in plastic.  Tie a ribbon around it and add a personalized tag.
This makes a cute little gift for someone.
Go over to sisters4saymoreismore and check out Sophie's

"Dear stripes, I love you." post.

She spent $1.50 and made a great skirt.

Monday, September 20, 2010

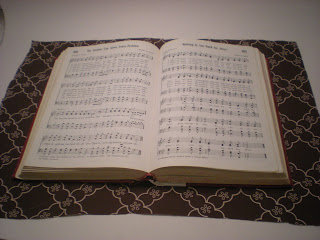
Stylish Book RecoverTutorial


Do you have books that you would like to keep around but are in bad shape or would you just like some books for decorative accents?  Then let me show you how you can recover a book for "$1.50 and Under".  For me, this project is pretty much free because I have all the supplies on hand!

Supplies:
  • fabric (I used an old table cloth)
  • Spray Adhesive
  • scissors
  • a book
  • Duct Tape (if your using a book that needs repair)

 1. First use duct tape to re-enforce any weak areas in the books cover.


2. Now open your book up, lay it down flat, and cut out your fabric to have about a 2 inch overhang on each side.


3. Turn your book, opened with the pages down, and spray your adhesive on the cover.  Now lay your fabric down over the cover and smooth it out. Close the book and begin to smooth the fabric out along the spine and then the backside of the book.  Make sure to push the fabric down into the seems of the book's cover.

4. Now cut a straight cut on the overhang on the side of the spine (the top and bottom of the book).  Please refer to picture.  Now spray a small amount of adhesive on the fabric tabs you just cut and push them into the inside of the spine's cover.

5. Next open the book and spray the adhesive on the instead of the fabric's overhang on the inside of the cover.  Fold the top and bottom fabric pieces down and then the side piece.  Then fold the corners in (use a little more adhesive if needed) and push them down flat, like in the photo.

6. Finally, to cover the raw edges of the fabric  you can do one of two things. You can cut a piece of cardstock (the same size as your pages) 
or you can use the inside page of the book (which is what I did).
Here's the finished project!  Cute right!


Thursday, September 16, 2010

Changing My Blog Design

So it only took me three days to complete the new changes!  I could figure out how to center my header.  I finally got it.  I thought it was time for a change.  What do you think?  It's really yellow!  Is it to much?  Tell me what you think.

Monday, September 13, 2010

$1.50 and under Monday: Scrabble Tile Pendant


I read this great tutorial over at Trey and Lucy for making Scrabble Tile Pendants.  I've change it up a little bit to keep the price down and make the process shorter so my UCCC MOPS group can make them in a meeting. So here's my tutorial (but please check out Trey and Lucy's too, she did a great job)

Materials:
  • Scrabble Piece (or in my case I used a scrabble piece knock-off given to me from a friend :).)
  • Mod Podge (orange bottle with sealer)
  • Applicator for the glue
  • Scrapbook paper (look for something with a smaller pattern)
  • X-acto Knife
  • Sandpaper
  • Super Glue
  • Pendant bail
   1.  The first step is to decide what part of your scrapbook paper you would like on your pendant and then apply a layer of Mod Podge on the back of the paper and a layer onto the pendant (I used the side with the letter but if you are using a real scrabble piece you may want to use the blank side),now put the glued sides together. 
        
         2.  Now get out your X-acto knife and cut around the tile piece and sand off the rough edges around the sides of the tile.


        3.  Apply a layer of Mod Podge to the front side of your tile. Next, I added my initial (you may choose to skip this step) and apply another two layer of Mod Podge in a criss-cross pattern.

     
    4.  Now for the last step, take your bail pendant (I used a Y-bail pendant) and super glue it to the top backside of the tile.


    Special Touch:  I like to try to do something with meaning for my mops crafts and so on the back I'm going to have the moms write a word or two that inspires them in there mothering (with a sharpie). 

    Monday, September 6, 2010

    $1.50 and under Monday


    I'm in charge of the crafts for my MOPS group @ Union Center Christian Church.  We have a group of about 70 women and each monthly meeting we do a craft with the women.  The catch is they have to be $1.50 per person.  So as you can image I do a lot of craft-blog-searching looking for ideas.  I thought I'd share with you some of my findings because it's always fun making cute, cheap, crafts.

    1.)    My first craft is these tote bags with liners 
    (this is actually from my site).  
    I was able to make these (9x10" totes) for .75cents each. 
    To make them extra fun, I added this doily design idea on my tote bag from 
    AshleyAnnPhotography.com's
    blog.  She did a way better job so make sure to check it out on her blog.  I bought a big package of doily's at the dollar store and used them for my stencil.


    2.)   My second idea was these really cute Match Box Magnets from

    All you need is a match box, a magnet, a cute picture and some Mod Podge.  They are really cute right?


    3.) Next are these cute Tile Coasters, check out the tutorial at Blueprint Crafts.


    4.) My last under $1.50 craft idea for the day is this cute bangle.  I'm yet to try this myself but am looking forward to it.  Next time I'm at the craft store and remember to pick up the fabric glue, I'll give it a try.

    Make sure to check out the tutorial at Sisters 4 Say More is More,
    this tutorial turns a cheap looking plastic bangle into a super cute accessory!


    Hope you are able to give some of these a try!

    Friday, September 3, 2010

    Napkin Rings Tutorial

    So a couple of months back I found these fun wooden shapes for .09cents each and thought they would make cute napkin rings.   What do you think?
    I think they would make a fun addition to a spring or summer time dinner table.


    Here's how I made them......

    First I collected my supplies:
    • wooden shapes
    • napkin rings (I bought mine at the dollar tree store, 6 for $1)
    • black & white spray paint
    • scrapbook paper
    • mod podge (red label w/ sealer)
    • hot glue 
    • sand paper
    Directions:
    1. Spray paint napkin rings desired color (I chose black) and wooden shape's back side.
    2. Apply mod podge on the backside of scrapbook paper and front side of wood shape and then put glue sides together.
       3.  After a few minutes (giving time for the glue to dry) cut the wooden shapes out with an x-acto knife.
      4.  Now sand along the edges of the scrapbook paper, make sure there's no scrapbook paper hanging over the edges.
    5. Now apply two coats of Mod Podge in a criss-cross pattern to the top side of the wooden shape. Finally hot glue the back-side of the wooden shape on to the napkin ring.


    Enhanced by Zemanta